Szolgáltató adatai Help Sales ÁSZF Panaszkezelés DSA

How to Long Tail Cast on Circular Knitting Needles

The long tail cast-on is a classic technique in knitting. Most knitters use the long tail method. It is well-known for its speed and stretchiness. It's one of the most popular ways to teach new knitters to cast on, and for good reason. Whether you knit with single pointed needles for a flat project such as a scarf or a dishcloth or use the circulars for a wide-width project or a pair of socks, you can adopt the method to make your first stitches. In fact, even if you knit with a set of double pointed needles you can cast on one knitting needle and then transfer stitches to the other needles that will form the circumference.


With one knitting needle in your hand you make the first stitches that you’ll knit from. The slip knot is counted as the first cast on stitch in many knitting patterns and projects but make sure that you have the right count. In fact if you are going to go ahead with a project that requires knitting in the round it is recommended that you cast one extra stitch that would later be used for joining the round.


Now, getting back to the topic of how to cast on stitches on circular knitting needles by the long tail method, let’s get started. To cast on stitches use the same knitting needle you would be using for the project or a size bigger if you have a tight tension or you could also take two knitting needles of different sizes and use them as one.


How to Calculate Yarn for Long Tail Cast on?

Before you make the slip knot on the knitting needles, make you're generous with the length of the yarn tail. In the long tail method, you'll be using the tail when casting on. So, in case you run out of yarn, you won't be able to cast further stitches and have to begin again. Getting just the right length of yarn can be tricky. But, it’s better to have enough yarn than not! But, then again too long tails can be annoying.


There are many ways to calculate how much yarn you’ll need. A general rule is to take four times the yarn length than needed for width or circumference project or three times the width of the project you're casting on for, plus about 6"/ 15cm extra. A very useful technique is to cast on stitches from both ends of the yarn ball or skein so that you will never run out of yarn or use another yarn ball.


With calculations done, let’s make the long tail cast on.


Step 1: Make the slip knot on the knitting needle and hold it in your right hand. As you are using a circular needle hold one tip and let the other dangle.


Step 2: Use your left hand to grasp the two tails of yarn. Hold the yarn with the palm open and index finger and thumb at the top. Position your thumb and finger to create a “slingshot” or a V shape. Keep the same position of the hand and yarn after each cast-on stitch.


Step 3: Insert the knitting needle under the strand of yarn wrapped around your thumb. Remember to hold your left hand like a pistol with the index finger and thumb. Pull up the yarn strand wrapped around your index finger.


Step 4: Pull your yarn out through the thumb loop. Also pull your thumb from the loop of the yarn and pull the yarn to tighten the new stitch.


Step 5: Insert the needle tip into the left thumb loop from below. Pull the yarn strand from your index finger with the right needle, from right to left. Pull the index finger yarn strand down through the loop on your left thumb and release the yarn from your left thumb.


Step 7: Use your thumb and index finger to tighten up the stitch and return to the slingshot position.


Repeat the steps to continue the long tail cast-on until all of your stitches have been cast on. Make sure to leave a 6-inch tail to weave in yarn ends. If you are going to join the round make sure to cast an extra stitch and if you are knitting back and forth, have the exact count of stitches.


The long tail cast on works for a variety of projects. The stretchy method works perfectly for tight knitters. While the method works for even a blanket pattern make sure that you won’t run short of yarn by casting on stitches from both ends of the yarn ball or skein you’ll be using for the project.


Now with the cast on stitches, start your knitting pattern. Work according to the instructions or the way you have planned your project. The long tail method gives you a stretchy cast on so make sure to bind off with a similar stretch method.

Source: https://www.zupyak.com/p/3382846/t/how-to-long-tail-cast-on-circular-knitting-needles

Tovább

Knitting a Blanket with Circular Needles

Want to make a blanket for yourself or a loved one? Knitting a blanket may seem like a big undertaking but it is one of the simplest projects. You do not even require a pattern as you can plan your own design. All you need is yarn (a few skeins or even leftovers from your stash will do), your knitting needles (straight needles for back and forth knitting) and some accessories.

Let’s walk you through knitting a blanket on circular needles. This guide shall help a beginner with the blanket project as well as advanced makers to make one without a pattern. So let’s get started.

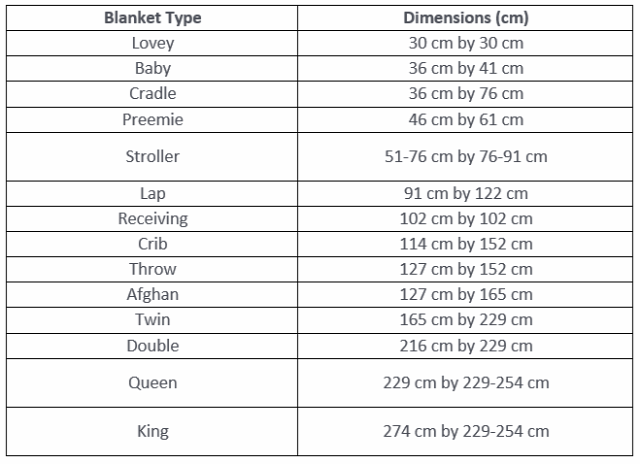
We’ll start with a quick glance at the size of the blankets. Deciding upon the project dimensions will assist with making decisions about knitting needles, yarn and the construction part of the project. Baby blankets are fun to make as well as quick projects, adult-sizes do take time and effort but it is a worthwhile gift as well as a beautiful way to decorate your home.

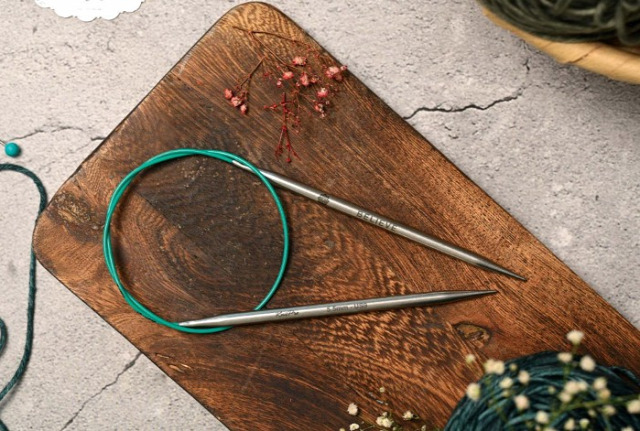
Knitting Needles — We have chosen a pair of circular knitting needles, preferably with cables 100 to 150 cm. Single-pointed knitting needles work too, but they won’t be able to accommodate all the stitches and the project will become very heavy and tedious. The needle size depends on the yarn weight and the look of the fabric you want to make. Smaller needle sizes work with lightweight yarns and bigger needles work with chunky-weight yarns. Given the multiple benefits of knitting with circular needles, it is the best choice for a blanket. The cables of the needle carry the weight of the project keeping your hands & wrists free from fatigue. Also, the needle length accommodates stitches of the entire length or breadth of the blanket. In fact, working on circulars has the benefit of carrying the project on the go but make sure to have a tote bag for easy storage and organization.

Yarn Weight & Material — The yarn choice depends upon the blanket’s recipient. A baby blanket needs to be soft, warm and not fuzzy. While adult ones can be experimented with. Wool is warm and durable, wool blends are a good choice while the cotton yarn is also a good option. If you have leftovers from your stash you can include them too. Make sure the yarn weight matches. If they are different weights make small squares or patches and then join them together.

knitting needle set works for blanket knitting as well as other projects. Make sure to have a handy darning needle, sharp scissors and blocking tools.

Blanket Knitting

Knitting a blanket is similar to a bigger version of knitting a gauge swatch. You simply knit row by row back and forth. Both the right side and the wrong side are visible. Blankets can be knit as one piece or can many squares can be seamed together to make a rectangle or square fabric.

In knitting, all stitches are based on the knit and purl stitches. The most common stitch patterns are garter (pattern of all knit stitches on all rows) and stocking stitch (pattern of alternating rows of knit and purl stitches). There is no harm in going ahead with the common stitches but you can also try textured patterns such as seed stitch, moss stitch, cables and more. For your blanket just make sure to have a uniform edge around all sides. You can ensure neat edges by adding a border of garter stitches or an I-cord.

While a blanket is forgiving in regards to a gauge, it is always recommended to make one. With the knitting needles and the yarn, you’ll be using for the blanket make a small square of 10X10 cm. Wash and block the tension square and then calculate the row and stitch gauge. With the gauge, calculate the yarn needed for the project and get a glimpse of how the pattern will turn out to be. With this, get ready to cast on your blanket.

Knitting a blanket or any other project, make sure to always have the right tools. The Mindful Collection has a range of smooth stainless steel knitting needles and accessories. A choice of needle sizes and a variety of cable lengths and an inspirational word imprinted on the needle helps to reap the meditative benefits that come with knitting.

Source: https://medium.com/@mindfulknitpro/knitting-a-blanket-with-circular-needles-ac144ee5673f

Tovább

When do You Need a Slip Stitch in Knitting?

Slip stitch is more of a knitting technique than a stitch. Abbreviated as Sl in knitting patterns (both Uk and US) the stitch can be used in a variety of ways. All you need is your knitting needles (single-pointed, double-pointed, fixed circular or interchangeable) and yarn. It is a very simple technique and one clearly by its name. You simply slip a stitch into the other knitting needle without working on the stitch.

In knitting, slip stitches are used in multiple ways, though the idea remains the same- slip the stitch to the other needle. While working with stainless steel knitting needles you can enjoy stitch-making all the more. The stitch is used for knitting back and forth (flat) as well as round (circular knitting). The technique is used to create an even edge on your finished garment or create shapes or interesting colourful patterns or even tighten the last stitches of the round.

A knitting pattern that calls for a slip stitch (sl), will usually indicate how to slip the stitch knit-wise or purl-wise but many times you need to understand how to do it according to the stitch pattern or the project you are working on. So, let’s take a look at how to slip stitches and also when we need to work with the stitch technique.

  • Slip the Stitch Knit wise

Insert your knitting needle in the stitch as if to knit, but then transfer the stitch from the left needle to the right needle without knitting.  The working yarn will remain behind the work.

  • Slip the Stitch Purl wise

Insert the knitting needle in the stitch to purl but then again simply move the stitch to the other needle. The yarn will remain behind the work.

Besides knitwise and purlwise slipped stitches, there are many instructions you would find in knitting patterns. Here’s how you do it.

  • Slip Stitch with Yarn in Front (WYF) or Yarn in Back (WYB)

WYF simply means "with working yarn in front" and WYB means "with working yarn in the back". A common mistake knitters make with WYB or WYF is they assume that ‘back’ or ‘front’ means the right and wrong sides of the piece. However, in this case, front and back refer to the placement of the yarn.

  • Slip Stitch with Yarn on the Needle (WYON)

WYON means the yarn is carried on or over the knitting needle. It is worked on both sides of the pattern - WS and RS the same way. Hold the working yarn in front of the stitch and insert the right knitting needle into the next stitch from back to front as if to purl and then slip the stitch onto the needle. Bring the yarn over the knitting needle from front to back of the stitch, placing it next to the slipped stitch (sl) and work the next stitch according to the pattern.

Learning the slip stitch is simple and will allow you to incorporate new designs and more colours into your knitted garments.

  1. Slip Stitch Colourwork Methods

Slip stitch in colourwork knitting patterns can create a similar effect to Fair Isle or Mosaic knitting, but more simply. Non-knitters won’t know the difference! All you need to do is change colours and slip stitches.

When working slip stitch colourwork patterns, you’ll end up with lines of spare yarn, called ‘floats in the back. It’s essential to keep these floats loose enough so that the front of the piece does not pucker. The key thing to remember is not to pull the floats too tight. It helps to keep the stitches evenly spread on the right needle after they have been worked. 

Here’s a good tip if you are new to this technique: Knit a gauge swatch and practice a segment of the slip-stitch pattern before diving into the project. Right after you work the slip stitch section of the pattern, gently spread the stitches on the right-hand needle to an even tension. Working on circular knitting needles for colourwork methods have bonus points. The needle length allows the spreading of the stitches making it easy to see clearly.

Once you get the hang of it and see how your floats can lay flat and not droop or look tight, you will be confident in maintaining that tension on a bigger project.

  1. Slip Stitch Chain for Neat Edges

Besides being a beauty on its own, a slip-stitch chain makes your knitting pattern look neat. In fact, it is the commonly used knitting trick for neat edges. While working on a project like a scarf or a dishcloth or even a blanket, slip stitches edges are handy.

  1. Slip Stitch for Seamless Rounds

Slip stitch when knitting in the round allows a seamless start of a round. Whether you are working with double-pointed needles or circular needles when you get to the last stitch of the round, simply slipping the stitch offers a tight and neat finish.

The slip stitch in knitting has endless possibilities. Do give it a try!

Source: https://knitpromindful.bcz.com/2022/11/10/when-do-you-need-a-slip-stitch-in-knitting/

Tovább

How to Knit Socks for Beginners?

Socks are quick and easy knitting projects. It is fun to make socks as long as you have the right knitting needles for your project and also the right yarn to go with it. The options to knit socks are double-pointed (DPNs), fixed circular and interchangeable circular needles. The choice of knitting needles is totally your call given your comfort.

To start with your sock knitting project, first, gather your supplies and yarn. If you have a pattern, follow the instructions. But, if you are planning your own design, first calculate the number of stitches to cast on. Do keep in mind everything about negative ease so that the socks have the right fit. Starting with a knit gauge swatch is the best option for accurate measurement of row count, stitch count and how much yarn you’ll need.

For knitting socks, the yarn you choose must be a sock, fingering or light-weight. If you want warm woollen socks or soft cotton for babies or just a handy pair of superwash yarn, make sure to buy yarn accordingly. You can also use your scrap yarn as long as you have the required amount of yarn. This makes it possible to create colourful socks.

So, let’s get started.

Knitting socks on Double Pointed Needles (DPNs)

The original method for knitters to make socks and to date favoured by many, double-pointed needles is ideal for knitting socks. Choose sizes 2.25mm (US1) & 2.5mm (US 2) with lengths of 10 cm & 15cm. You can knit with four of five needles. Make sure you make a circumference with the needles and keep one free for knitting.

Cast on stitches on one needle and slowly transfer them to three other DPNs. make sure that all needles have equal stitches. Begin knitting round by round and you will see your sock growing. For beginners managing the needles may seem fiddly but as you only with two needles while the rest hang on, you can manage after a few rounds.

Sock knitting on Circular Needles

Circular needles are ideal for seamless knitting projects such as socks. You simple cast on stitches and begin knitting round by round.Both fixed circular knitting needles as well as interchangeable circular needles are appropriate as long as you have the right needle length. The needle tips for circular needles are either 10 cm (4") and 13 cm (5"). More importantly, the cables can either be 80cm (32″) or 40cm (16″). It should be wide enough to accommodate all stitches and move freely.

Magic Loop with one circular needle

The Magic Loop is a knitting method done with circular knitting needles. You need to work with a long 24″ (60cm) or 32″ (80cm) circular needle. The cable plays a major role in Magic loop knitting as you have to navigate it carefully through the stitches so make sure to use smooth, memory-free cables.

Two Circular Knitting Needles

Knitting socks on two circular needles is also for advanced knitters, but you can give it a try. With this, you can knit two socks at once using two separate circular knitting needles, with the same size needle and the same cable length. 40cm (16″) to 80cm (32″) are mostly preferred.

Knitting with single-pointed needles

Many knitters love to knit back and forth and sew the pieces. This can also be done for socks. You knit your project and then sew it with a darning needle.

So, here we are with the many methods of knitting socks. What's your favorite technique?

Source: https://writeupcafe.com/how-to-knit-socks-for-beginners/

Tovább

How to Block Your Knitting?


Blocking your knitting is a major step in the successful completion of projects. After your project or a gauge swatch is off the knitting needles, it’s time for blocking. Blocking means relaxing your yarn and the overall knitted project. After all your yarn has been wound, unwound, twisted, tugged and stored for the duration of making your project. Now, the knitted yarn needs some love and pampering. There are many ways to block your knitted projects with specially-designed blocking tools to smooth your process.

Let’s take you through the method of blocking.

  1. Wet Blocking - A common way of blocking wool and animal fiber yarns. Fill a sink or tub with lukewarm water (hot water may cause felting in wool!) with some wash and mix it thoroughly.Submerge your project until fully saturated.Let the knitted project rest in the bath for at least 10 minutes and up to 30 minutes. Lift the project out of the water gently. Make sure to not let the knitted project stretch or distort due to the water weight. Lay your wet project flat on a clean, dry towel or bedsheet. Roll the cloth and gently press out the extra water. Once its semi-dry, lay your project on blocking mats or a rubber yoga mat (spare one), bath mat, etc. Adjust your project and pin it with knit blockers.


  1. Spray Blocking – Lace projects and cotton fabric is blocked with spray blocking. Lightly spray with a diluted mix of wool wash and water in a regular spray bottle. The damp project can be shaped to approximately match the finished dimensions. Place knit blockers at intervals while stretching your project to the desired dimensions. When your piece is fully dry, unpin and use.


  1. Steaming – This method is recommended for delicate lace projects. Use knit blockers to pin the knitted project. In this method, you would want the steam to penetrate the piece. So, lay a light sheet or cotton towel over the project. If the project is made of cotton yarn, you can let the iron touch the fabric very lightly. You can also steam first and let your piece rest after using the knit blockers.

Use the blocking methods for your knit gauge swatch. After the swatch has been blocked, it will give an accurate result of the row and stitch count. You will also get a clear idea of how the yarn reacts after being washed, sprayed or steamed. For blocking your knitted projects, carefully use the knit blockers. Do not insert between the stitches. Blocking can work wonders for many projects, allowing to match dimensions, let the yarn bloom and even clean the yarn. So, be it the stockinette stitch or the intricate cables or the delicate lace, you make on any of the knitting needles, do not miss out on the process of blocking. Like knitting needle sets make your life easier, so does the blocking tools. You will be thankful for the extra effort.

If you want to explore and practice the meditative aspects of knitting, the Mindful Collection offers stainless steel needles & accessories to enjoy crafting!

Source: https://uberant.com/article/1874308-how-to-block-your-knitting/

Tovább
0 db

knitpromindful

blogavatar

Phasellus lacinia porta ante, a mollis risus et. ac varius odio. Nunc at est massa. Integer nis gravida libero dui, eget cursus erat iaculis ut. Proin a nisi bibendum, bibendum purus id, ultrices nisi.

Utolsó kommentek